



Salon Build-Out Guide: What to Expect During Construction
Your design is finalized. Your furniture plan is coming together. And now the part that makes most salon owners nervous is about to start: construction. This is where every decision you've made so far becomes real — and where timelines can slip, budgets can creep, and small choices can turn into big headaches if nobody is managing the process.
Here's the good news: a salon build-out doesn't have to feel like it's happening to you. Treat it like a project you're managing, not a process you're waiting on, and you'll protect your budget, your timeline, and the quality of the space you're about to open the doors to.
Quick Answer
A salon build-out is the construction phase that turns your finished design into a physical space — demolition, framing, plumbing and electrical rough-in, inspections, drywall, flooring, paint, fixture and furniture installation, and a final punch list. It typically runs a few weeks to a few months depending on scope, and costs vary widely based on square footage, the condition of the space, and how much plumbing and electrical work is required. The best way to protect yourself through all of it is a written schedule, a locked scope of work, and payments tied to completed, inspected milestones.

Start With a Real Construction Schedule
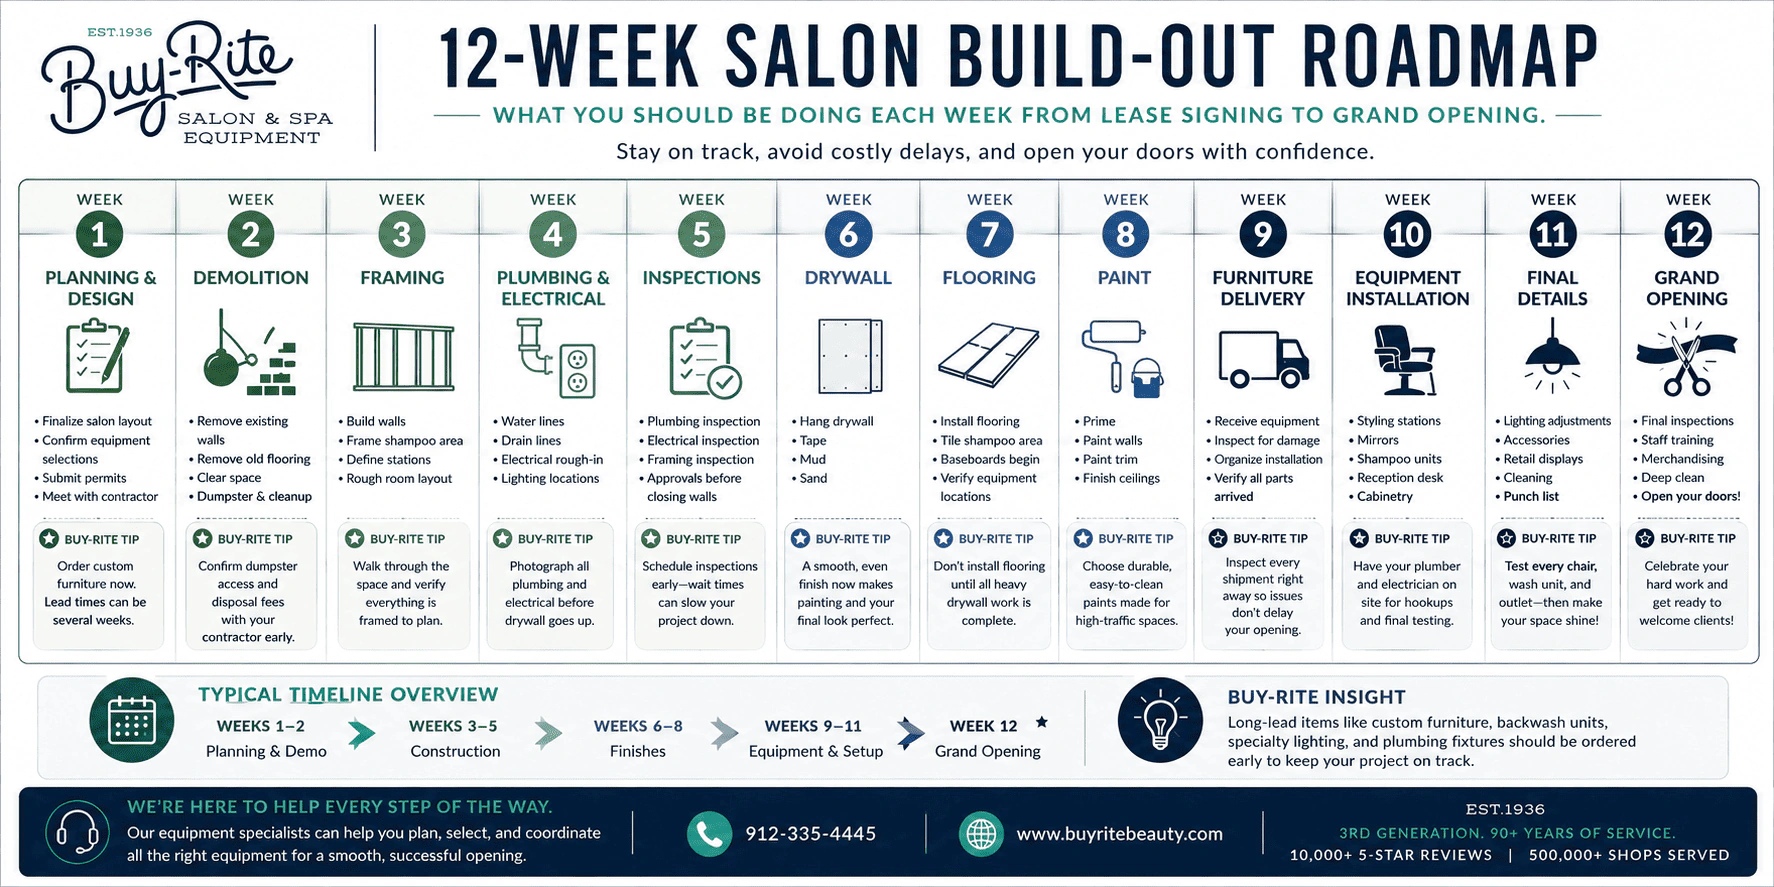
Before anyone picks up a tool, you should have a written schedule that lays out a start date, a target completion date, and every major phase: demolition, framing, plumbing and electrical rough-in, inspections, drywall, flooring, paint, installation, and a final punch list.
Pay close attention to long-lead items — custom furniture, plumbing fixtures, backwash units, specialty lighting — since these can quietly become the thing that delays your opening. And know your decision deadlines. Paint colors, flooring, fixtures, and station placement all need to be locked in by a specific date, or they'll hold up the trades behind them. Build in buffer time, too. Permit delays, backordered materials, and hidden plumbing issues are common enough that you should expect at least one.
Lock the Scope Before You Begin
One of the fastest ways to lose control of your budget is letting the scope drift after work has started. Before day one, get a clearly defined scope of work in writing: what's included, what's excluded, and who's responsible for each piece — demolition, plumbing, electrical, flooring, paint, millwork, permits, inspections, dumpsters, and cleanup.
Once construction begins, any change becomes a change order — usually meaning more cost, more time, or both. That's fine, as long as every change order is documented and approved in writing before work proceeds.

Structure Payments Around Completed Milestones
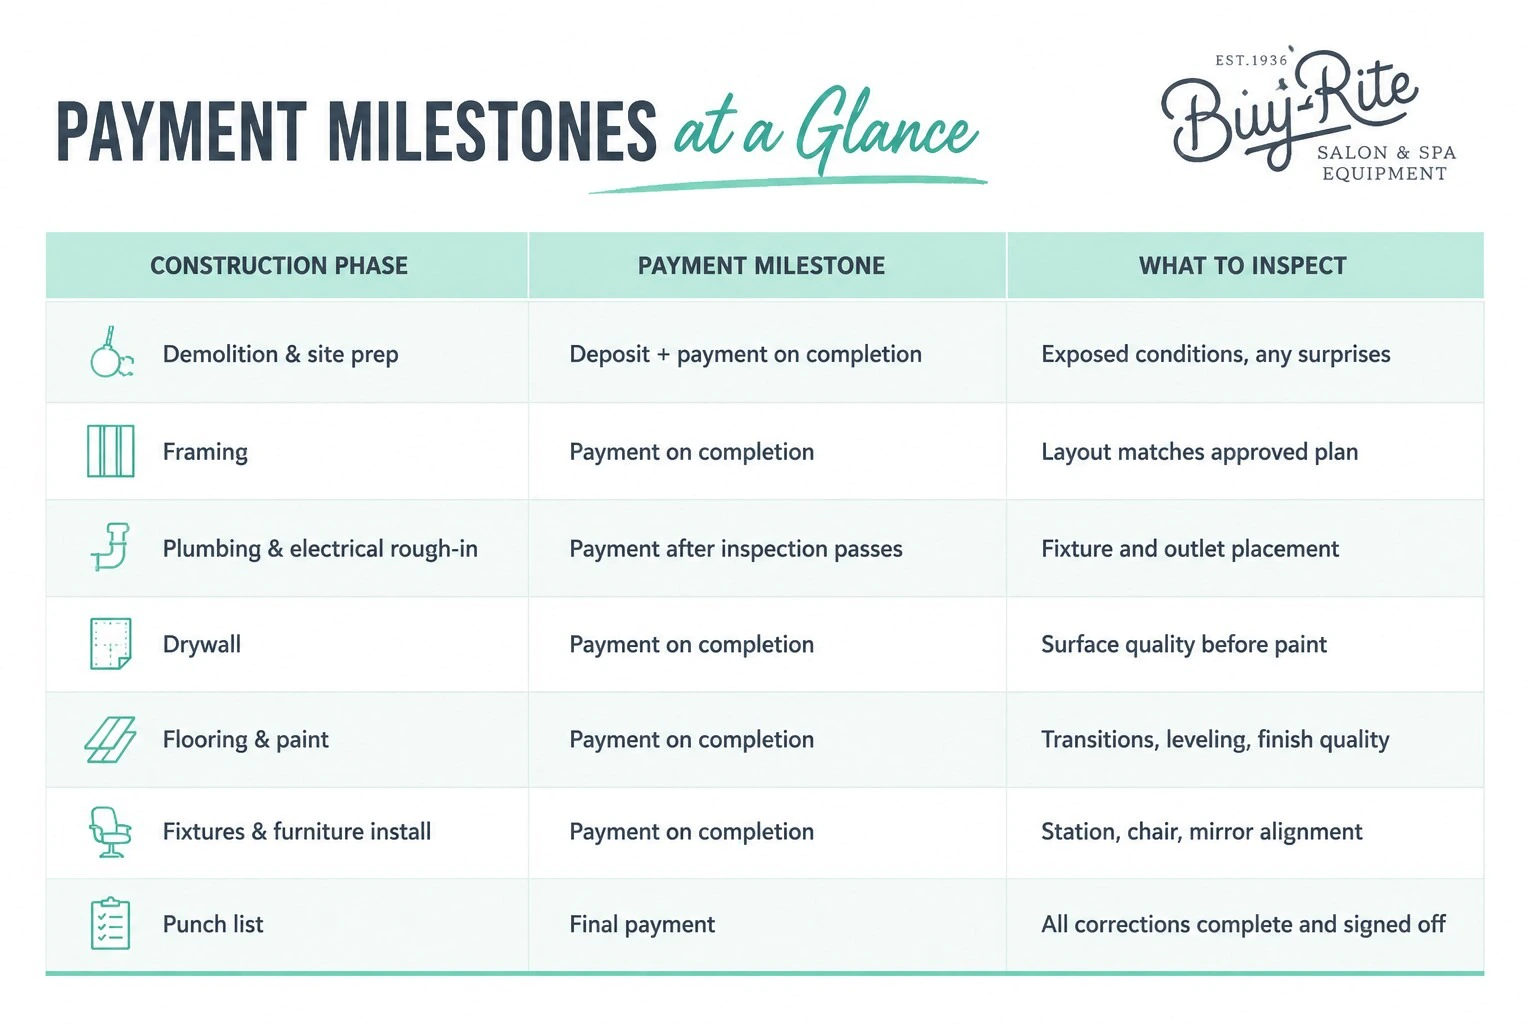
Your payment schedule should reward completed work, not time spent. A strong structure looks like: a reasonable deposit to schedule the job, then payments released after demolition and site prep, after framing, after plumbing and electrical rough-in passes inspection, after drywall, after flooring and paint, and after fixtures and furniture are installed. Final payment is held until the punch list is fully complete and signed off.
Avoid paying too much upfront. If you've already paid for work that isn't done, you lose your leverage the moment timelines slip or quality drops.
Set a Weekly Communication Rhythm
Your contractor should never feel like a mystery. Set a weekly jobsite meeting on the same day and time, with a brief written recap afterward covering what was completed, what's next, and what decisions are needed from you.
Each week, ask: Was last week's plan completed? What's scheduled this week? What do you need to decide, and by when? Are we still on schedule? Any backorders or inspection delays coming?

Do Regular Site Visits — Don't Wait Until the End
Waiting until the end to see how everything turned out is one of the most common, and costly, mistakes salon owners make. Instead, walk the site at key moments: after demolition, to see what's actually behind those walls; after framing, to confirm the layout matches your plan; before drywall closes everything up, to verify plumbing and electrical placement; after flooring, to check leveling and transitions; and during installation, to confirm stations, chairs, and shampoo units land where they should. Take photos every visit. If something looks off, say so immediately.

Before Drywall Goes Up
Before the walls are closed, walk the space with your final floor plan and the specifications for the equipment you've selected. Confirm shampoo plumbing and drain locations, electrical outlets, station and mirror placement, lighting, and any equipment-specific requirements before they become harder and more expensive to change.
Don't assume similar-looking equipment has the same installation requirements. Your contractor should have the specifications for your actual shampoo systems, stations and other equipment before rough-ins are finalized.
Manage Inspections Like a Project Manager
Confirm early who's scheduling inspections — you, your contractor, or individual trades. Ask for inspection dates in advance, request immediate notice if anything fails, and keep records of every approval. Managed proactively, inspections become checkpoints instead of roadblocks.
Use a Punch List to Protect Final Quality
A punch list is your final quality-control tool: a documented list of everything that must be corrected before final payment goes out — cosmetic touch-ups, sticking doors, electrical or plumbing issues, flooring defects, and misaligned stations, mirrors, or chairs. Don't rush this step; it's where you make sure you're getting what you paid for.
Common Hidden Costs to Plan For
Construction budgets often increase due to costs not fully anticipated during the planning phase. Some of the most common surprises include permit and inspection fees, additional electrical circuits, electrical panel upgrades, unexpected plumbing relocations, water heater upgrades, flooring repairs or leveling, ventilation requirements, ADA compliance modifications, signage permits, internet and network wiring, security systems, dumpster fees, and jobsite cleanup.
Many of these expenses aren't the result of poor planning; they're uncovered as contractors open walls, review local building codes, or discover existing conditions that weren't visible during the initial walkthrough. Others occur simply because equipment selections weren't finalized early enough, requiring last-minute plumbing or electrical changes.
One of the best ways to reduce unexpected costs is to make as many equipment and layout decisions as possible before construction begins. Finalizing your floor plan, plumbing locations, electrical requirements, and equipment specifications early allows your contractor to build with confidence and minimizes the risk of expensive change orders later in the project. If an unexpected cost does arise, ask your contractor to provide a written explanation of the issue, the available solutions at different price points, how it affects your timeline, and a formal change order before authorizing additional work.


Coordinating Construction With Furniture Delivery
Furniture delivery can be smooth or chaotic depending on how well you plan for it. Confirm when your space can receive freight, whether it's secure and weatherproof, and whether you'll need a liftgate or loading dock. Plan where crates will be staged and who's on-site to receive, inspect, uncrate, and place everything. For larger deliveries, having your contractor or a designated team on-site prevents delays and protects your investment.
When to Bring in Outside Expertise
Construction is a constant series of trade-offs — speed versus perfection, saving money now versus avoiding repairs later. When those decisions start to feel overwhelming, an experienced outside perspective can save you from a costly mistake.
Common Mistakes to Avoid
-
Starting construction without a written schedule or locked scope of work.
-
Paying too much upfront and losing leverage if quality or timelines slip.
-
Waiting until the final walkthrough to inspect the work.
-
Approving change orders verbally instead of in writing.
-
Forgetting to plan furniture delivery logistics until the truck is already on its way.
Weekly Construction Checklist
-
Confirm schedule and top priorities for the week
-
Walk the site (photos + notes)
-
Verify layout and rough-in locations match the plan
-
Track inspections and confirm they're scheduled
-
Approve change orders in writing only
-
Confirm milestone completion before releasing payment
-
Keep a running punch list — don't wait until the end
FAQ
How long does a salon build-out typically take? Most salon build-outs take 4 to 12 weeks, depending on the scope of work, permit approvals, inspections, and the lead times for custom furniture and equipment. Larger remodels or new construction projects may take longer.
How much does a salon build-out cost? Costs vary widely based on your salon's size, the condition of the space, and the amount of plumbing, electrical, and construction work required. Be sure to budget for hidden costs like panel upgrades, plumbing relocation, permits, and additional electrical outlets.
What is a punch list? A punch list is a final checklist of items that need to be repaired, adjusted, or completed before the project is considered finished. It's typically reviewed before final payment is made to ensure everything meets the agreed-upon standards.
Should I pay my contractor upfront? A reasonable deposit is standard, but avoid paying for large portions of the project before the work is completed. Tying payments to clearly defined construction milestones helps protect your investment and keeps the project moving forward.
Who is responsible for scheduling inspections? Inspection responsibilities should be clearly defined before construction begins. Depending on your contract and local requirements, inspections may be scheduled by your general contractor, individual trades, or the property owner.
What inspections are typically required? Most salon build-outs require plumbing, electrical, framing, and final inspections, though requirements vary by municipality and project scope. Your contractor should coordinate inspections throughout the project to help ensure everything meets local building codes before work continues.
Conclusion
A salon build-out isn't something you sit back and wait on — it's something you manage. A written schedule, a locked scope, milestone-based payments, a weekly communication rhythm, regular site visits, and a real punch-list process are what stand between you and a construction experience that drags on, drains your budget, or leaves you with a space that doesn't quite meet the standard you paid for.
If you're still refining your layout before construction begins, grab our free download, The Ultimate Guide to Designing Your Salon Layout, or explore our Salon Furniture & Equipment Packages to start planning how your space will come together once the walls go up.


